
The Complete Step-By-Step to Create Shopify eCommerce Store Tutorial For Beginners

by merodomain
Complete Shopify Tutorial For Beginners 2020 – How To Create A Profitable Shopify Store From Scratch. Here is we are try to make A step by step guide, A to Z, on how to create a profitable Shopify eCommerce store from scratch in 2019 and 2020. In this article helps you make your own eCommerce store.
Steps:
- Register Domain Name.
- Create Shopify trail account
- Setup your register domain to your shopify eCommerce website
- Setup store setting General Store Address, Taxes, Shipping etc
- Activate Your Payment Processor
- Manage your company info in shopify & Setup Menu
- Choose shopify theme and setup customize theme and publish your site
Steps 1. Register Domain Name.
Before start online eCommerce website you have to register your own domain name for register domain please click here or type in browser merodomain.com and search your domain whatever you want after you search you have idea is available or not if available order domain.
1.1 Search Domain Name :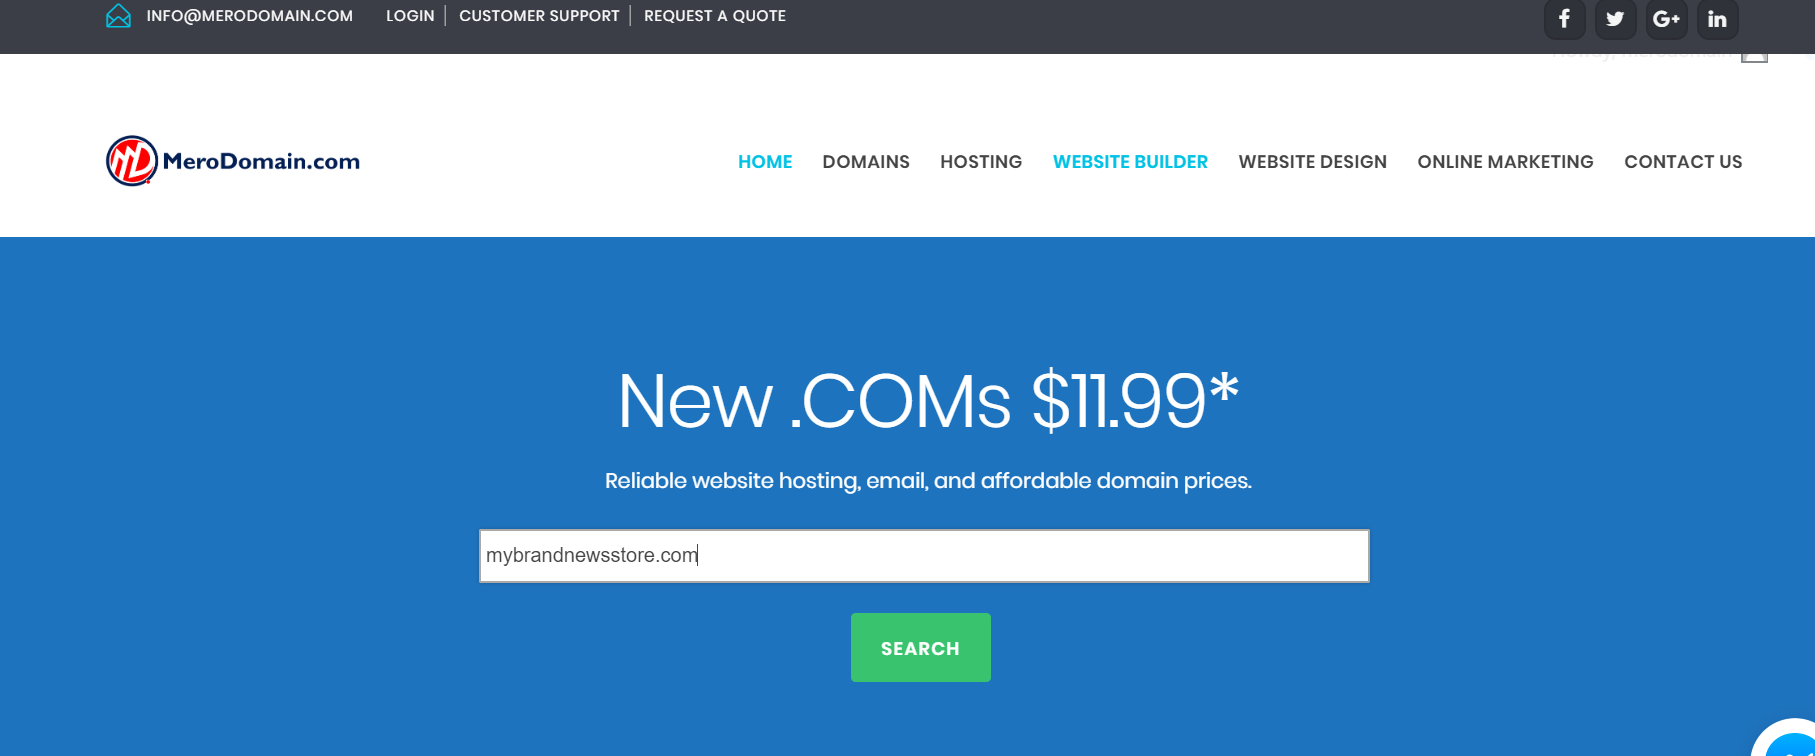
1.2 Domain Search Result :
Click add to cart an click continue to cart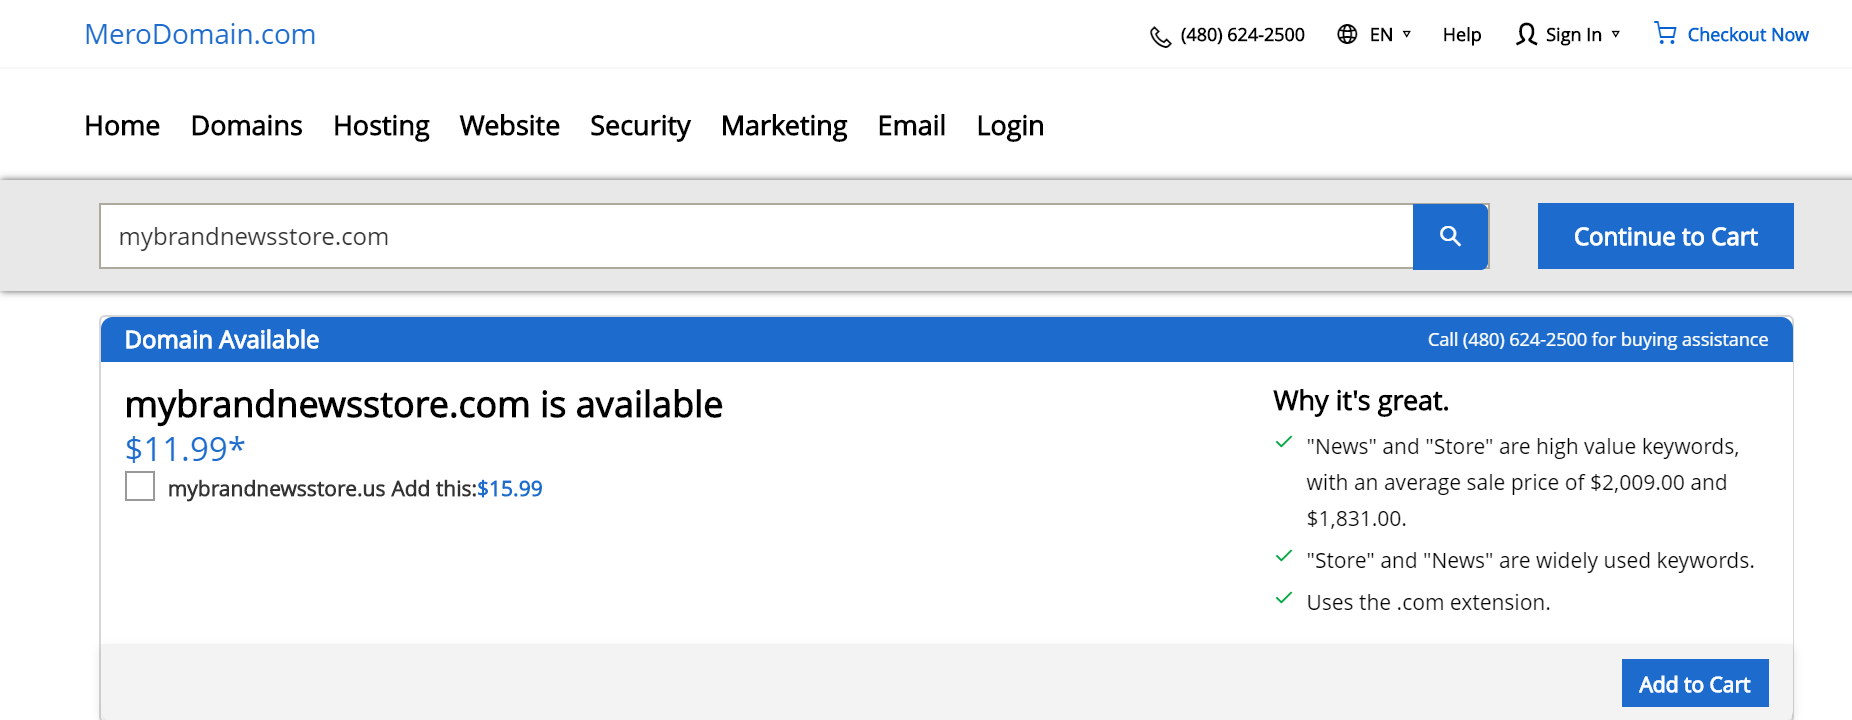
1.3 Click checkout and create account and finish order for domain registration.

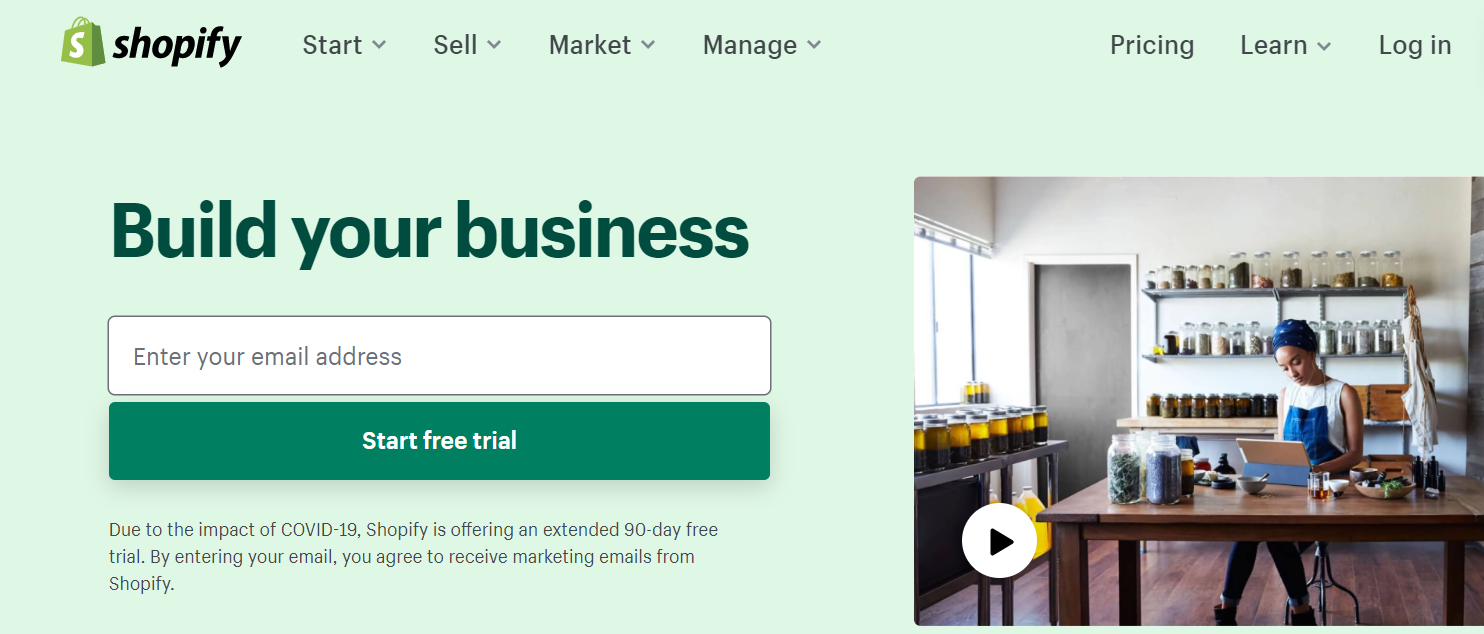
2. Create Shopify trail account
After register domain name now you have to setup your trail store. for setup trail store please click here.

After click this will be display and type your email address and click create store.
after click store fill up your information


After enter address information then click enter my store then you will be enter you brand new shopify dashboard area looks like below.

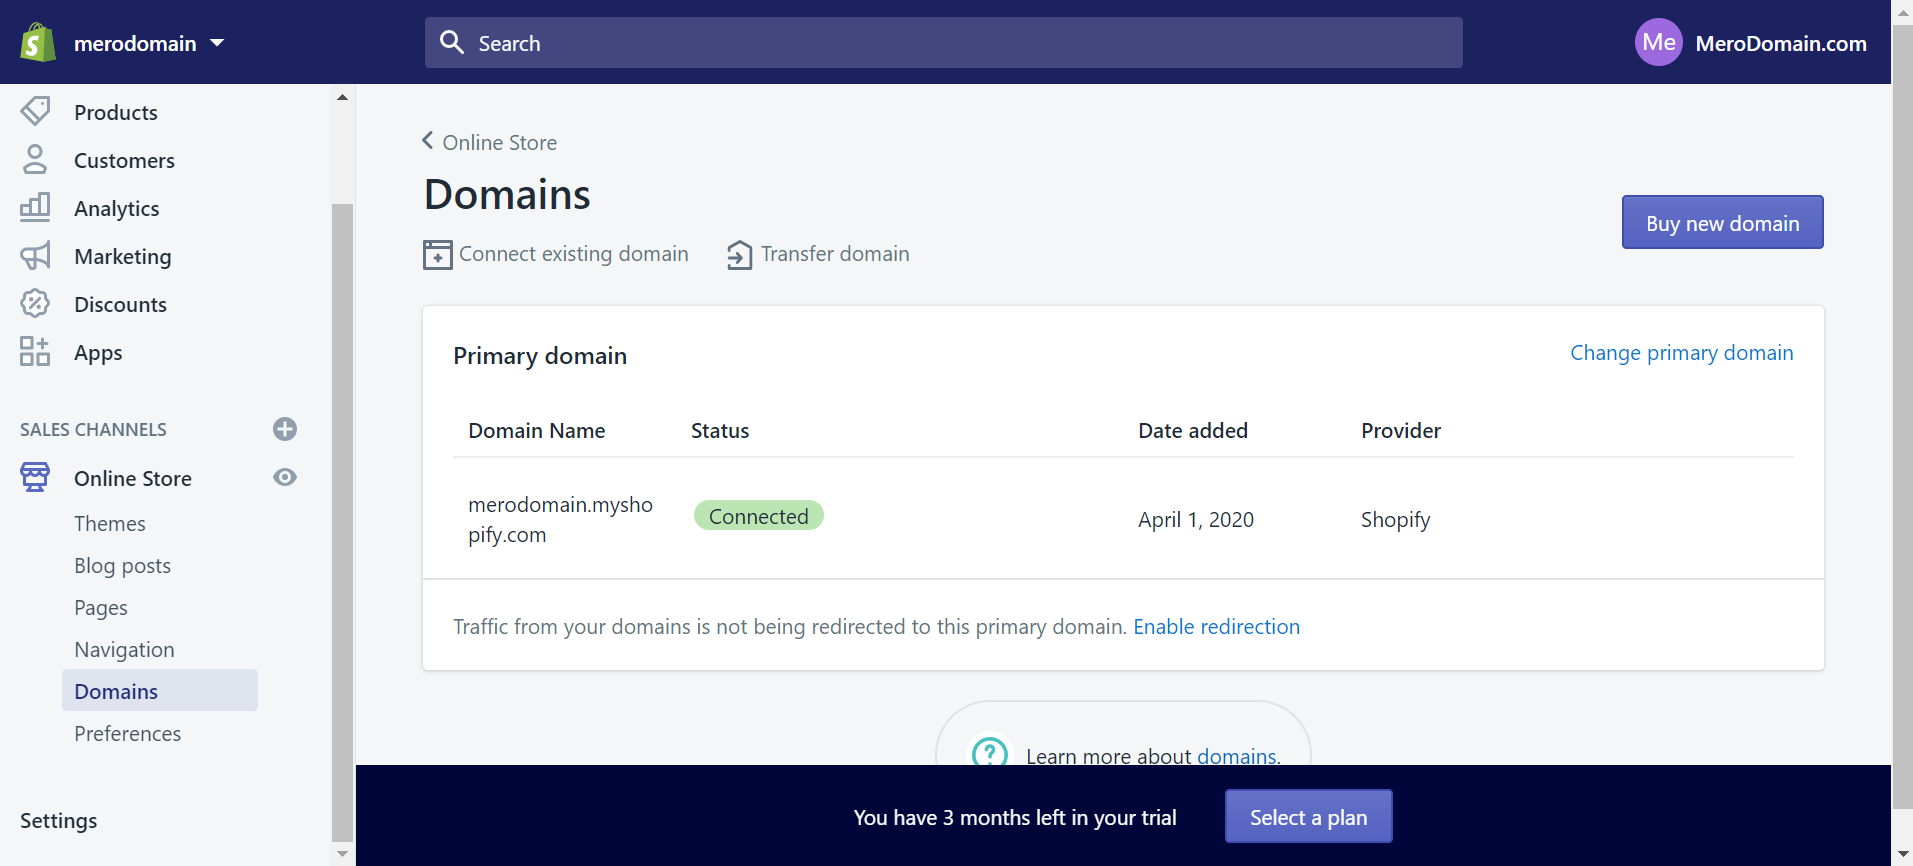
3. Setup your register domain to your shopify eCommerce website
You have already register domain name and shopify store too. Now you have point your domain to your shopify store. here is steps.
- -> Click online store
- ->Click Domains
- -> Click connect existing domain
and then type your domain name and click next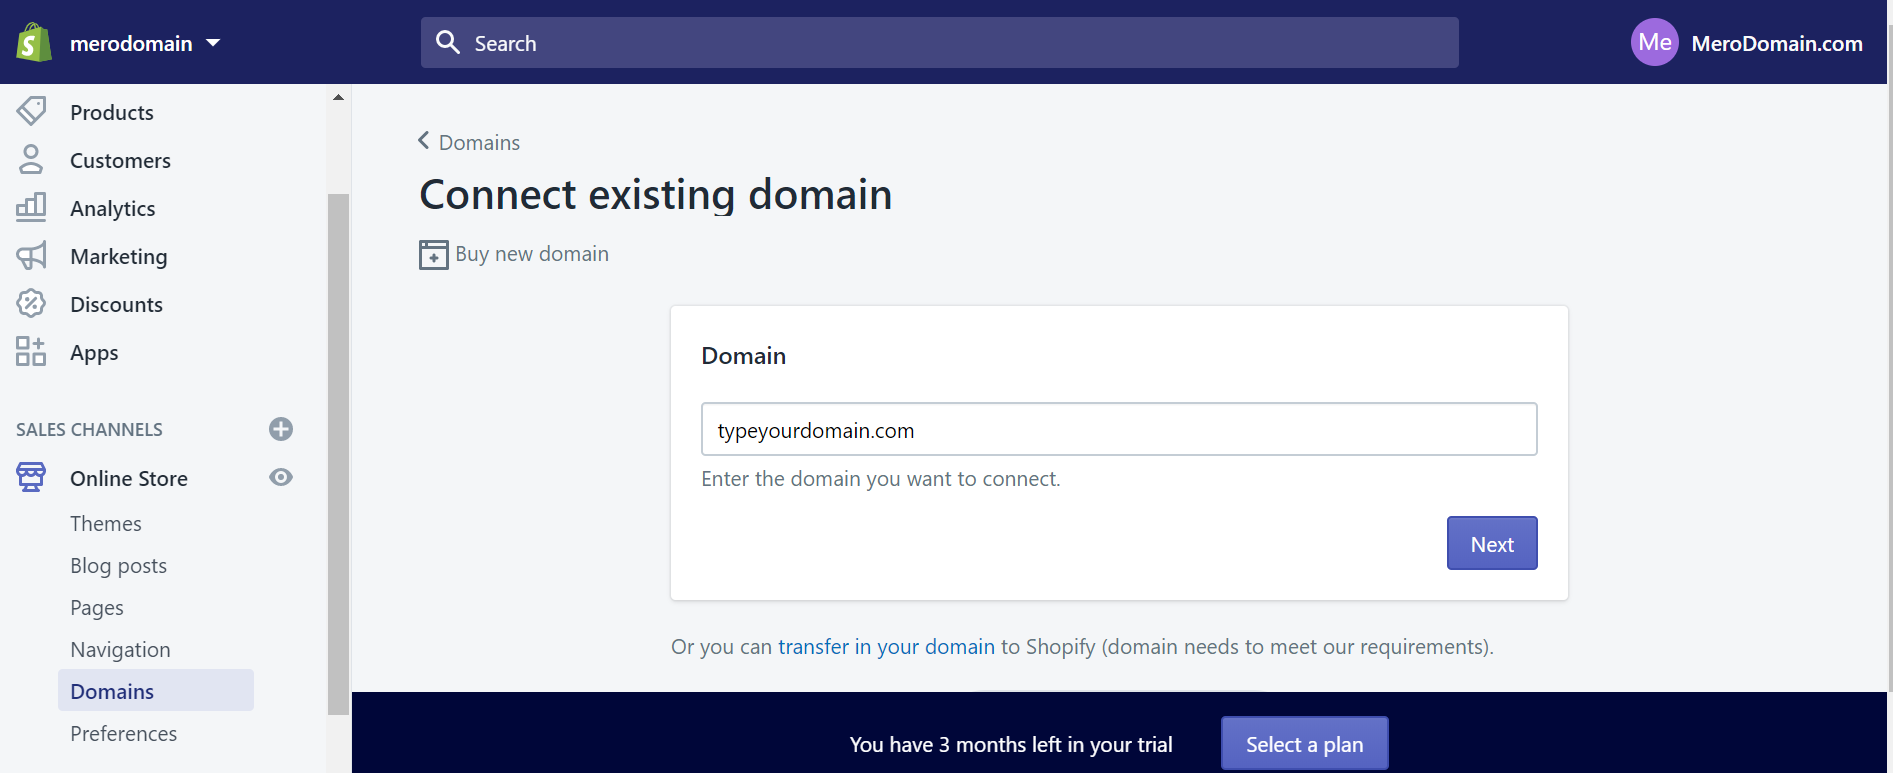
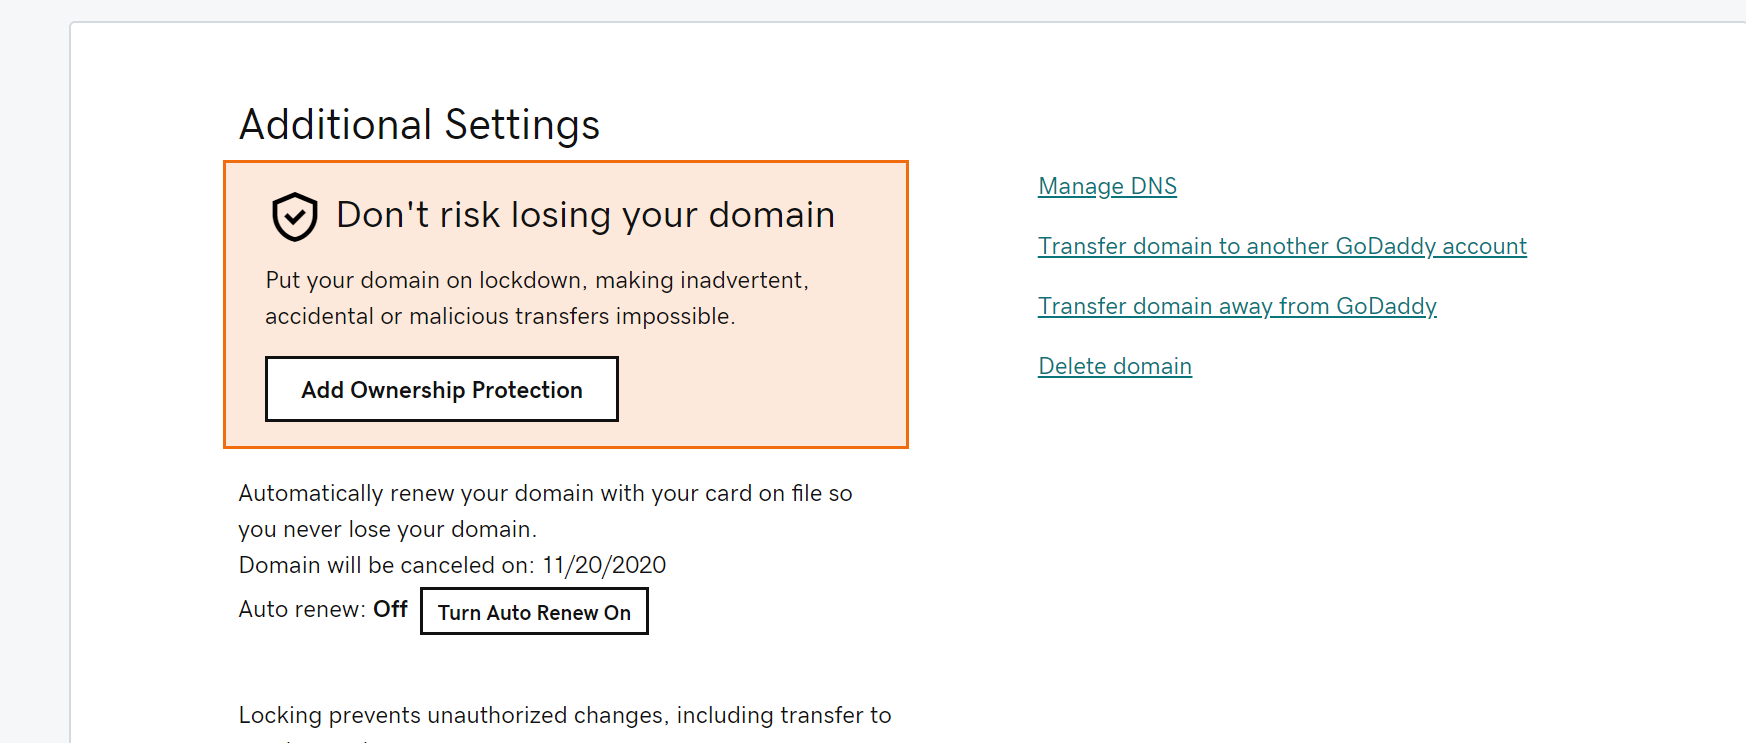
Now you have login your domain register site which merodomain.com or your other site. If you register domain with merodomain.com then login and click my account click products and image will show like below

Here is you can see your domain name and then click domain name or click manage domain then below picture will be shown.
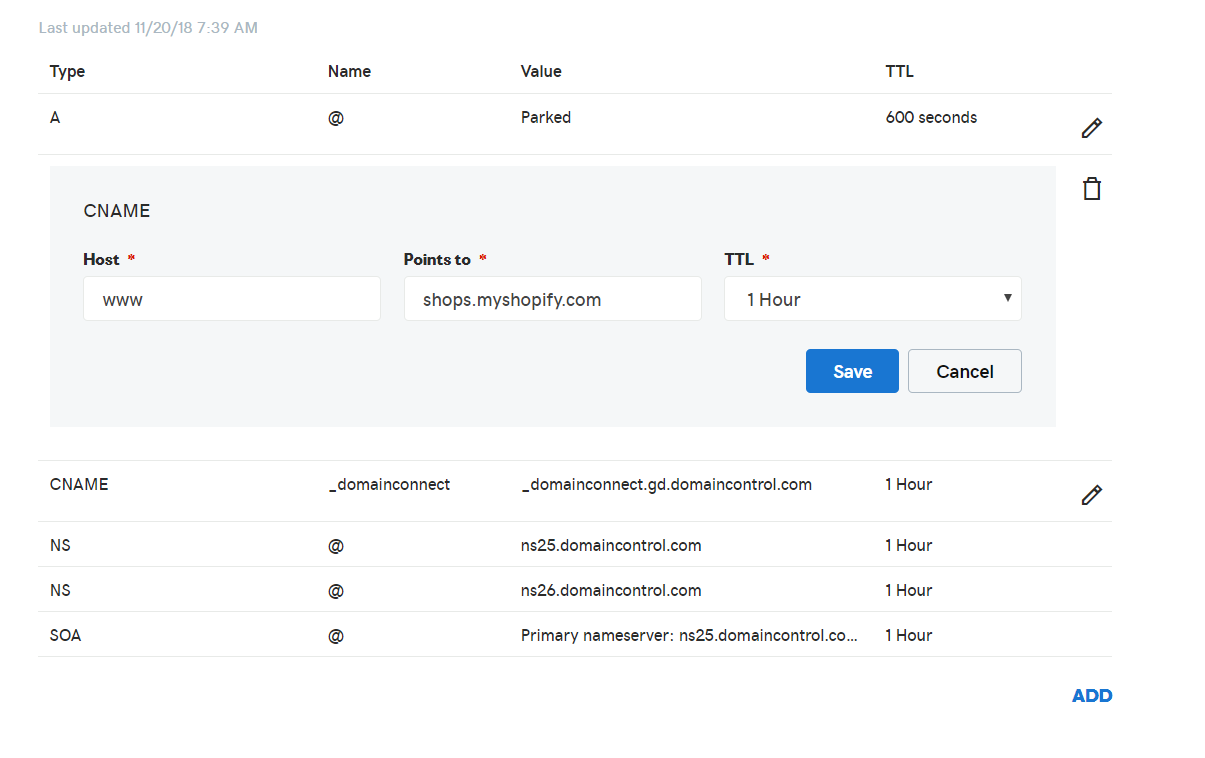
Then click manage DNS then following page display then click cname and change like below 2nd image.

Click A edit pencil icon and put below and click save

and click www pencil edit icon and click save
After this click click verify from you shopify account.
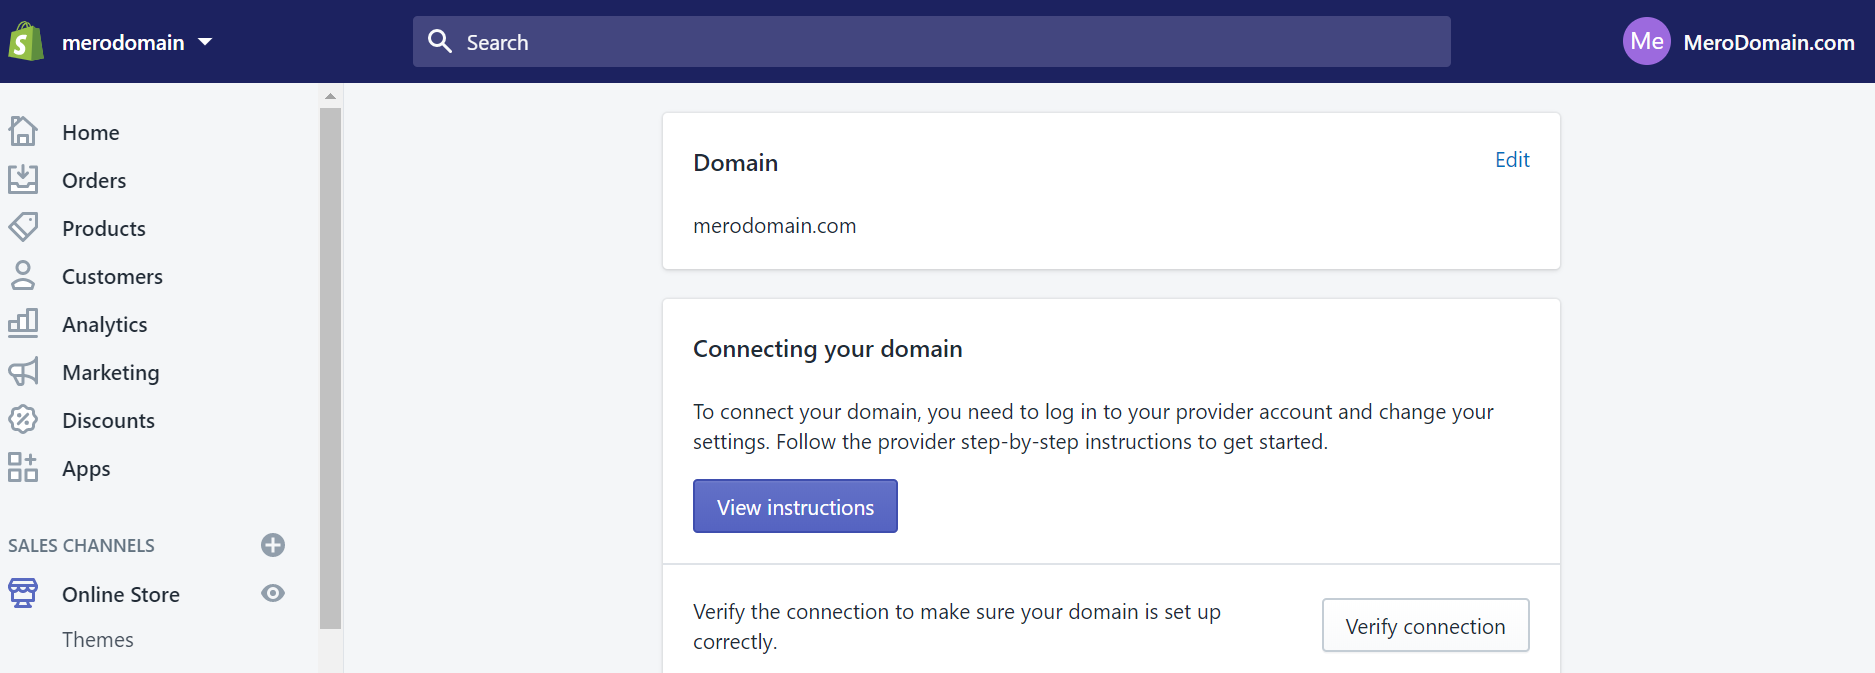 After verify your domain will point to your shopify site.
Step 4: Setup store setting General Store Address, Taxes, Shipping etc
Upon activation, you can then go to that particular domain and see your website.
While you’re in the main area of your Shopify website, make sure that the following information is complete:
- General: Keep all of your information filled in the settings area, including your billing information and legal details.
- Taxes: Ensure that you’ve got the box next to “charge taxes” in the Variants section of your website clicked to help with your accounting.
- Shipping: You’ll need to click on the “requires shipping” option next to products so you know which products need an extra price adding for postage and packaging. Remember to select either a weight-based shipping specification or choose something that helps you to sell as many products as possible.
You can also test your order system before you jump into selling online by going to the Admin section of Shopify, clicking on Settings, and going to your Payments settings. From the Payments area, deactivate it before you continue, then select a credit card gateway to test. You can click “Bogus Gateway” for testing, and then place an order just as if you were a normal customer.
Step 5: Activate Your Payment Processor
Click on the tab to the left of the dashboard called Payments. This area allows you to select from dozens of payment processors such as Stripe and Authorize.net. Shopify also has its own payment processor which is super easy to implement. Simply walk through the steps to activate your payment processor. This allows you to accept payments and put those payments in an account.
Payment gateways are some of the most important things you’ll need to consider when you’re building the ultimate Shopify store. Remember, the gateway that’s right for you will depend on a lot of different things, including:
- The transaction fees: Most payment gateways will charge you a small fee every time someone purchases something on your website. Make sure that you go for the gateway that gives you the lowest possible price.
- Card types: It’s important to select a payment gateway that accepts a wide variety of card types and other payment options, including things like PayPal and Stripe.
- Offsite checkout: Some payment gateways will take the payment process away from your website and into their own server using a form. This payment gateway strategy can be slightly more secure, but it’s also a bit of a pain for customers.
After all is said and done you can click on the Launch Website button to make the store live.
Congratulations! You now have a fully functional Shopify online store.
6. Manage your company info in shopify site
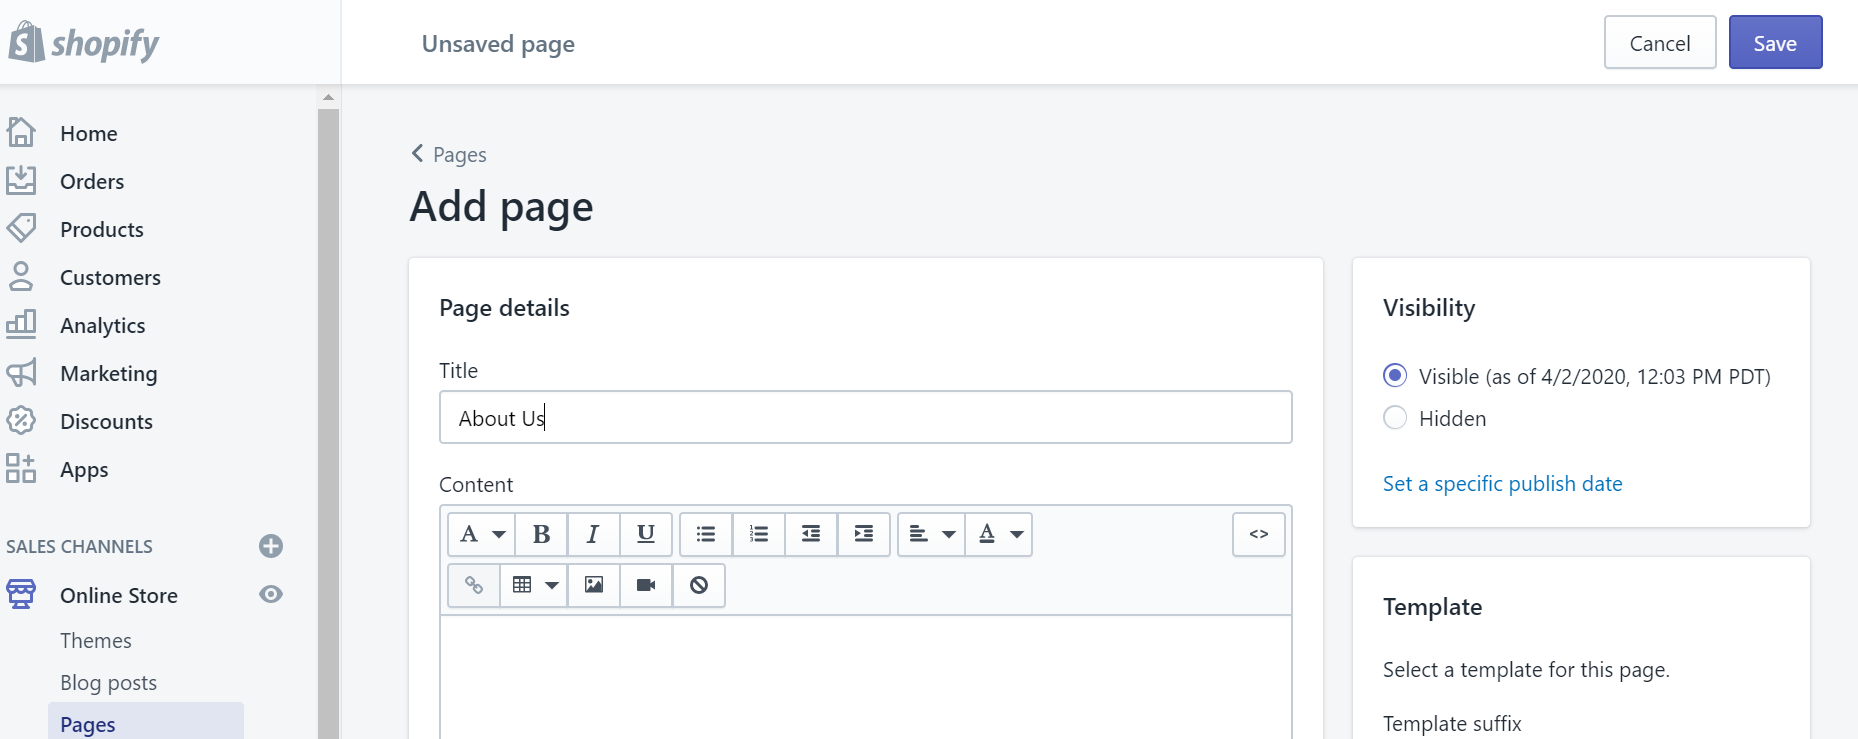
6.1 Add pages
Now you have add about your company, delivery information, privacy policy and terms condition etc. for that please click online store and click page and click add page.

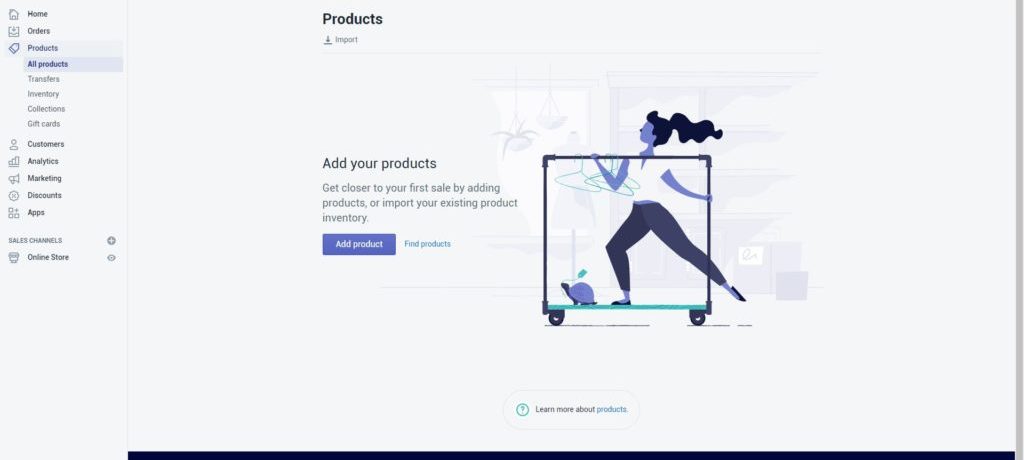
6.2 Add Product Category and products
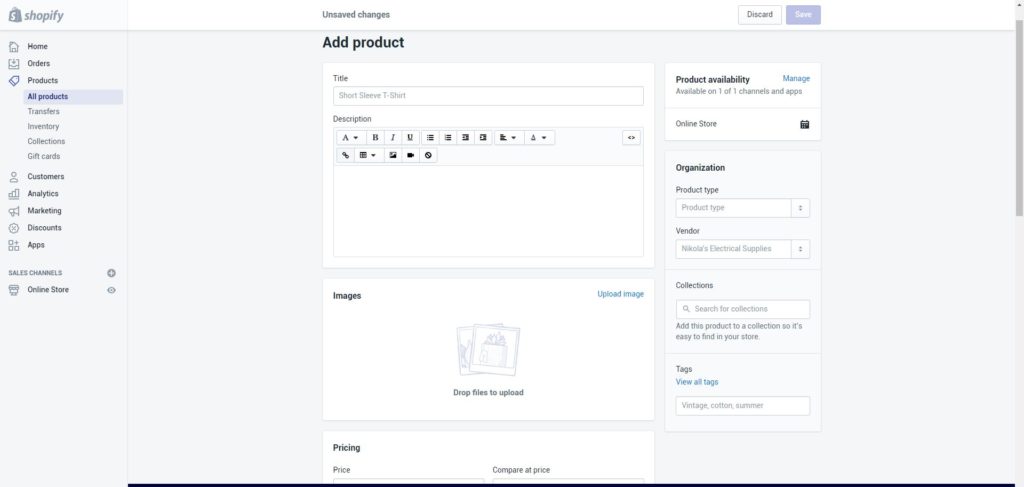
Navigating the bar on the left select ‘Products’. You will then see a blue ‘Add a product’ button in the middle of the page. Use the following screen to add as much detail as needed about your products. Especially look at those that will help with SEO such as name, description, and URL. Include as many details as possible to help inform the customers about your items.
This is the screen where you upload product pictures. Once the images are uploaded, you can rearrange them so don’t worry about uploading them in any particular order.
 The Product screen. Make sure you fill out as much information as possible.
Product images can make a sale so make sure you show your products off to their best and highlight any special or unique features with close up photos. To keep your store looking tidy, we suggest you keep all images the same dimensions. Unless you plan to make your collection pages look like a Pinterest board.
Once everything is filled out, always remember to click the ‘Save product’ button in the top and bottom right corners.
Set Up Collections (Groups of Products)
A collection is any group of products that have some features in common that customers might look for when visiting your store. For example, your customers might be shopping for:
- clothes specifically for men, women, or children
- items of a certain type, such as lamps, cushions, or rugs
- items on sale
- items in certain sizes or colors
- seasonal products, such as holiday cards and decorations.
Products can appear in any number of collections. Usually, you would display your collections on your homepage and in the navigation bar. This helps customers find what they’re looking for without having to click through your whole catalog.
 The Collection set up screen works in exactly the same way as the Product screen
Manual and Automatic Collections
When you add a new collection, you can select how products should be added to it. These are the two options:
- Manually - You add and remove products in a manual collection individually.
- Automatically - You can set up selection conditions to automatically include products that meet certain criteria.
6.3 Add Navigation
After add pages you have add menu like home, about us etc for that you have click online store and click navigation.
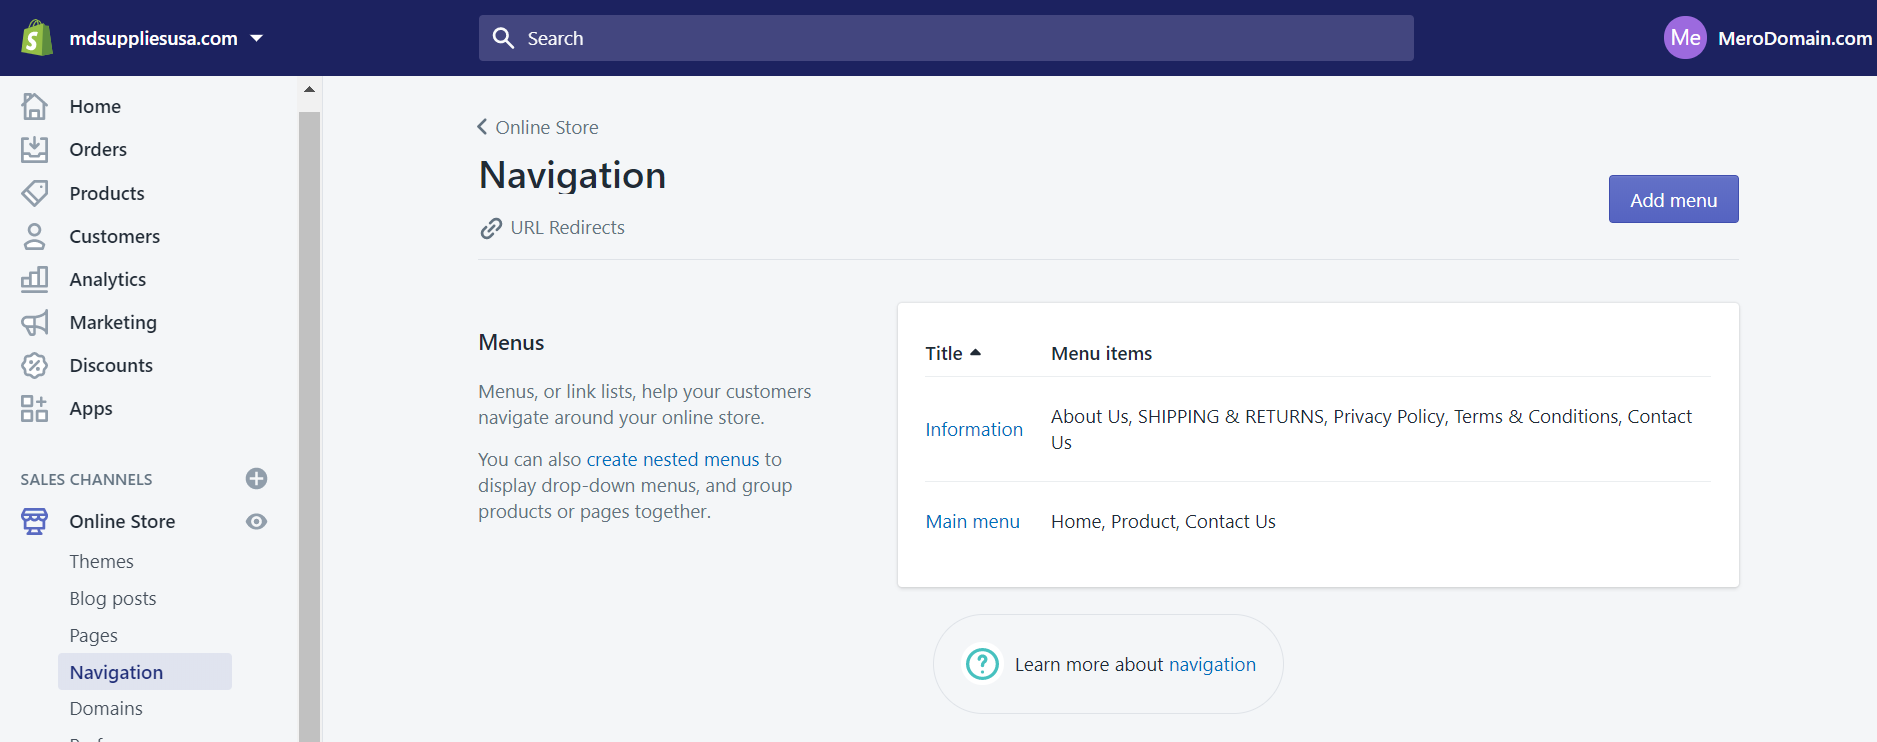 Then click main menu
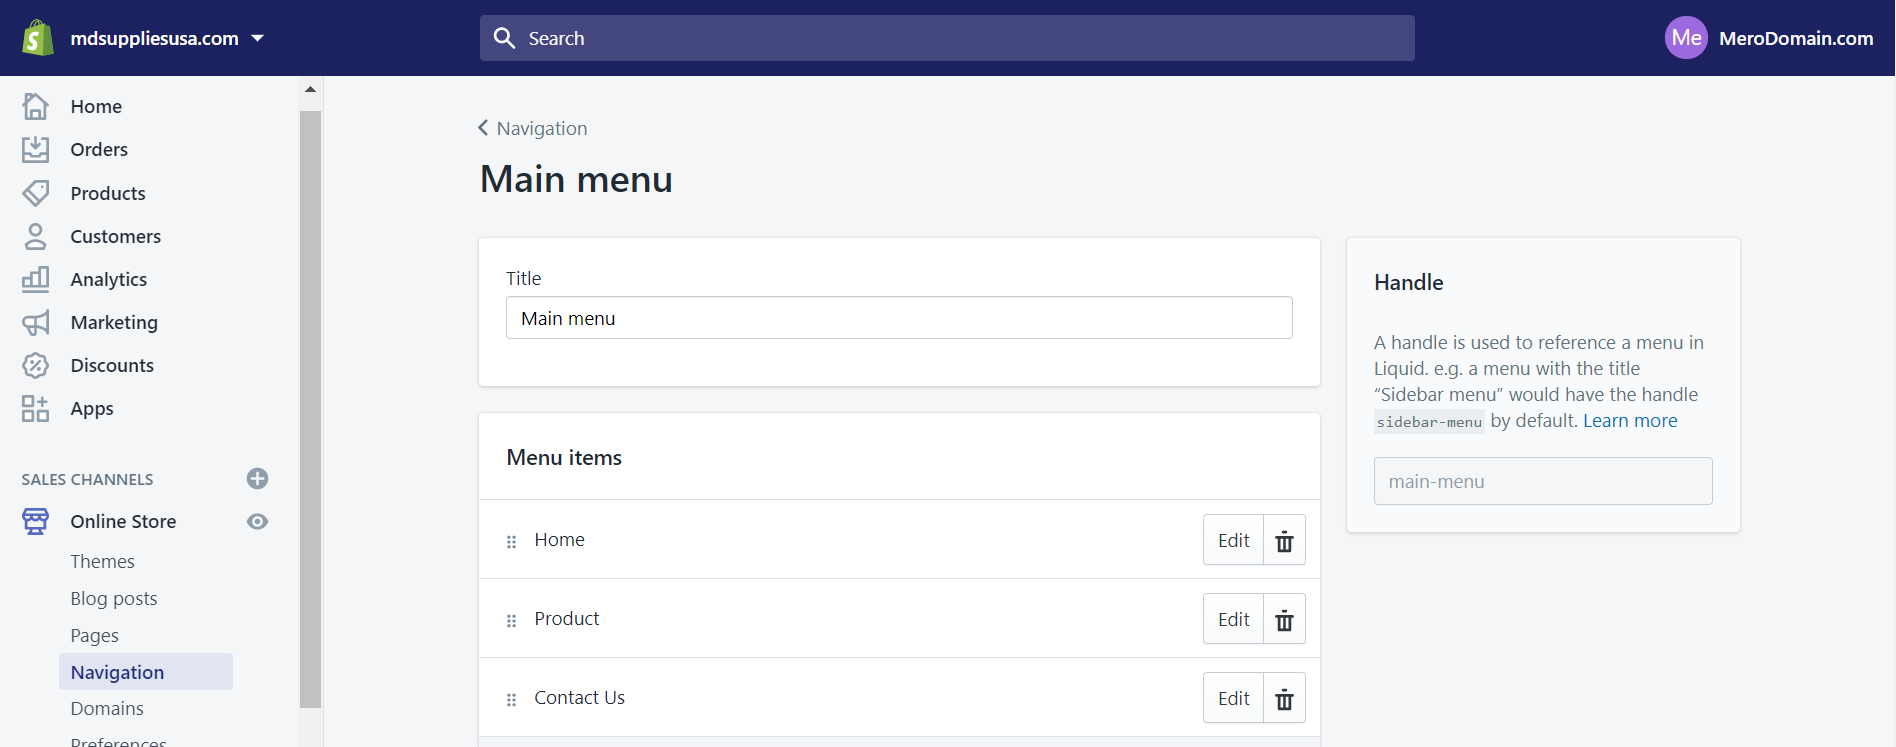 Then click add menu item and type menu name like about us, contact us and click link and select link type like page, collection etc
Then click add menu and click save menu.
7. Choose shopify theme and setup customize theme and publish your shopify ecommerce store site
Shopify has its own official theme store. These themes are all guaranteed to have full support from the designers so you know that your store is in good hands. for select theme click online store click theme from left corner and click free themes and choose good one theme.
1. Browse the Theme Store
Log into Shopify and visit the Shopify Theme Store at themes.shopify.com. You’ll find over 70 theme variations to choose from, including a good selection of free ones.

Once you’ve found a theme you like, click the green button.
Shopify will ask you to confirm that you want to install the theme.
Click Publish as my Shop’s Theme. .
After the theme has installed, Shopify will let you know and will give you the option to Go to your Theme Manager.
Your theme manager shows published themes (the one you installed or activated most recently) and unpublished themes below (previously installed themes).
Customize Shopify Settings
On your admin screen, select ‘Themes’ from the left navigation menu. On this page you will see your live theme in a box at the top, in the top right corner of that box will be two buttons. The first one is of three dots, which gives you some basic settings changes. One of these allows you to make a duplicate of the theme. We highly recommend you do this in case you make some changes you don’t like, you can delete the duplicate and start again.
The second button says ‘Customize Theme’. If you click it, you will be taken to a page that controls all the basic functionality of your store. This is a great time for you to have a thorough play with the settings and test out all the features so you can find out what your site is capable of.
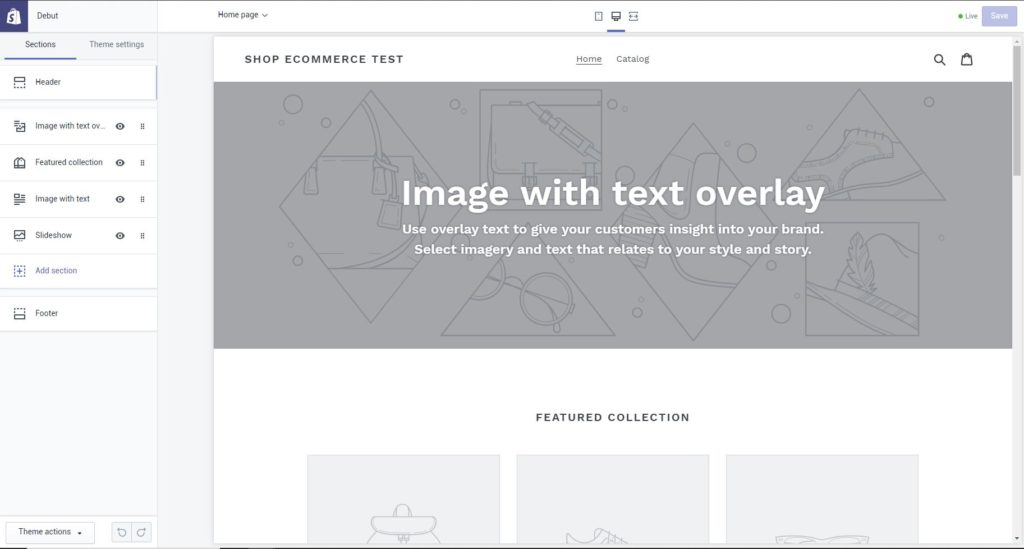 Your themes in custom settings.
The most common features will include:
- uploading logos
- uploading slides to a homepage carousel
- adding related item functionality to product pages
- choosing how many items appear on each line of the collection pages
- color schemes
- font choices.
Some themes will also allow you to reposition elements on pages such as showing product images on the left, right or center of the page. You can also choose whether you want to display social like/tweet/pin/+1 buttons.
After customize theme you can save and check your site.
I hope you will understand how to setup shopify store from start to end. if you like any help please contact us by email at info@merodomain.com.
Recommended Posts
Local Delivery Platforms Setup Services
April 23, 2021


5 Reasons Every Local Restaurant Needs A Website
December 18, 2020
 22
22
-
 Shopify eCommerce Store Design
- Deposit amount:
$99.00
- Future payments:
$400.00
$499.00 × 1 -
 Health, Beauty & Wellness Products eCommerce Website Design
- Deposit amount:
$594.00
- Future payments:
$4,200.00
$799.00 × 6 -
 eCommerce Website Design
- Deposit amount:
$1,287.00
- Future payments:
$18,200.00
$1,499.00 × 13 -
 BigCommerce Web Design and Ecommerce Web Development
- Deposit amount:
$99.00
- Future payments:
$1,400.00
$1,499.00 × 1 -
 Shopify Aliexpress Dropship Store Design
- Deposit amount:
$99.00
- Future payments:
$700.00
$799.00 × 1